
All Activity
- Today
-

400 to 427 conversion
Joey Mack replied to mackrmodel686st's topic in Modern Mack Truck General Discussion
The early e-techs use an offset cam key in low and high HP engines. You would flip the key one way or the other for the desired HP. In your case Inexpect you have this key. The cam shaft has to come out to do this. After that, nozzles, turbo, and data file should get you what you want. If you have a CCRS engine the cam key is left alone -

RL700L Video
mrsmackpaul replied to RoadwayR's topic in Antique and Classic Mack Trucks General Discussion
Well nearly jizzed in my pants Bloody cool stuff Have never seen any aluminum chassis on Macks out here Plenty of 671's but never seen one in a Mack Still good enough to put a horn on a jellyfish Really enjoyed this Paul -
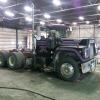
400 to 427 conversion
mackrmodel686st replied to mackrmodel686st's topic in Modern Mack Truck General Discussion
The truck is an 01 vision, I believe the motor is a 2000. -

IMG_5173_Original.jpeg
glenbjackson commented on JLAJ's gallery image in BMT Member's Gallery - Click here to view our member's albums!
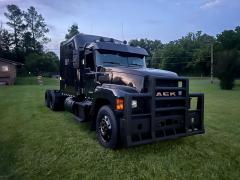 murdered out!!!!
 -
Well that one was left hand
-
Did the second R in the VIN designate right hand drive?
-
Wow, that was fantastic. Thanks for that. Truck is absolutely gorgeous….. bob
-

B modeel Mack Difference ?
Brian L Blaylock replied to Swishy.'s topic in Antique and Classic Mack Trucks General Discussion
The B-63 had a little higher weight rating than a B-61 and the second 3 meant that it had a factory turbocharger and the third number being a 5 as in B-615 meant a V-8 engine -

2002 Mack E7 engine brake Power Leash or Jacobs
Mackpro replied to Jody Scott's topic in Engine and Transmission
Good find on this bulletin. I pulled up the SB-266-020 bulletin and it says for ETECH and CCRS engines you need the 454GC5234A camshaft installed. If your truck has a CCRS engine it might already have that camshaft installed. -

RL700L Video
mowerman replied to RoadwayR's topic in Antique and Classic Mack Trucks General Discussion
It looks like quick farms latest purchase -
RL700L Video
mowerman replied to RoadwayR's topic in Antique and Classic Mack Trucks General Discussion
OK, I thought I’d add to old people story. I also Rode in that same truck when I was about 12 and they just bought it. My mom was a bus driver at that company and she broke down that one day and I was with her and we both rode in it. Never thought I’d be driving it a few years later. OK now I’m changing the subject. -
RL700L Video
mowerman replied to RoadwayR's topic in Antique and Classic Mack Trucks General Discussion
The first big rig I ever drove had a green oil dripper. I didn’t even have a class 1 license yet winter of 72. The company I was working for had a wrecker. It was a cracker box Jimmy. I only drove it around the yard. I was only 16 talk about a rush ha ha -
You could probably convert it backwards to a CCRS engine. Turbo, injectors, EUP’s , engine harness and engine ECM. The ASET AC engine uses a 3 connector ECM and EUP’s and VGT turbo that only fit the ASET AC engines. All other non-vGT ETECH style engines use the 2 connector ECM, getting someone to write a program and flash the AC ECM to delete the VGT might be a issue
- 1 reply
-
- 1
-

-
RL700L Video
mowerman replied to RoadwayR's topic in Antique and Classic Mack Trucks General Discussion
Well, it’s definitely got a lot of our attention -
RL700L Video
Brian L Blaylock replied to RoadwayR's topic in Antique and Classic Mack Trucks General Discussion
This is a Western R-700 the 6-71 is the factory engine this truck belongs to a friend of mine -
.thumb.jpeg.f939a477cf5bb42b60bbaf1e04b942ed.jpeg)
400 to 427 conversion
BottleHauler84 replied to mackrmodel686st's topic in Modern Mack Truck General Discussion
Need to figure out which pistons you have also. -

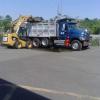
AI 427 manifold and turbo swap
Lilmeanfarmer replied to Orange cv713's topic in Engine and Transmission
Where can you get a tune? I want to delete my EGR cooler/valve and VGT turbo from my 2005 427. - Yesterday
-
400 to 427 conversion
Joey Mack replied to mackrmodel686st's topic in Modern Mack Truck General Discussion
What year is it ? -
Great work Larry.Iv been following this tread with great interest.... Paul
-
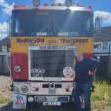
RL700L Video
cruiseliner64 replied to RoadwayR's topic in Antique and Classic Mack Trucks General Discussion
Yeah those Detroits sound amazing...theres no mistaken one.Id take that R and treat her to new frame rails and away we'd go..something like that when I retire would keep me happy for years... Paul -
RL700L Video
mowerman replied to RoadwayR's topic in Antique and Classic Mack Trucks General Discussion
And yes, I realize they probably didn’t have them in 68 -
RL700L Video
mowerman replied to RoadwayR's topic in Antique and Classic Mack Trucks General Discussion
I would just prefer a 285 but those oil Drippers do sound good -
I have a 2005 CX 613 with an ASET 427. I’m getting ready to change injectors and while it is torn apart, I would like to remove EGR cooler/valve and VGT turbo and replace with fixed geometry turbo. Has anyone here done this? If so where did you find a tune for it? I have two mid 90s E7 427s and this one doesn’t and never has kept up with them. I think we all know why. I have talked to two of my local Mack dealers and they call the ASETs the forgotten Mack’s. Thank you for your input.
-
RL700L Video
tjc transport replied to RoadwayR's topic in Antique and Classic Mack Trucks General Discussion
problem with that non turbo 671 is you will always be shifting and not go anywhere. now if it had a 8V71TA or an 8V92TA in it, that would be a different story.


-
Recently Browsing 0 members
- No registered users viewing this page.
BMT Forum Logo
