


Freightrain
-
Posts
7,715 -
Joined
-
Last visited
-
Days Won
44
Content Type
Profiles
Forums
Gallery
Events
Blogs
BMT Wiki
Collections
Store
Everything posted by Freightrain
-
Few things Made my shifter arm, bent it, installed all thread for handle and welded to isolator. Air lines are hooked up and it works. Can't play gear jammer until clutch is hooked up so I can get gears aligned. Welded bung for pyro and have pipe installed. Just need to get lower pipe adjusted properly and left side exhaust pipe attached to Y pipe. Only after I get clutch linkage because I need the room over their to crawl around. I will also work on heat shield for heater hoses once I get them clamped out of the way better. I will order a few pieces for linkage and post that in a few days. Rod ends, bushings, etc.
-
Just put $100 in my pickup and didn't fill both tanks(95 f150). Used to fill it for $40-50. So $100/week to get to work. Ugh. The hot rods won't be out and about much this year either. Might spend more time on the Harley. Luckily the Mack has 1/2 tank, so the first race on Memorial weekend will be "free". After that, it will be cha-ching. They are surely beating us down.
-
Absolutely. Once I get the pipe installed I will be working on a heat shield and tying the hoses up. It wasn't an issue with the 237, but this manifold tilted the turbo outward more and creates clearance issues. Bob, I got the clamp at Mack dealership. It was in stock? Strangely enough.
-
Thanks all for the stories. Here is some Saturday updates. Carrier bearing bracket: 1/2" plate welded to fit. I don't have any fab shop available since buddy retired and business was bought by new company. Due to slight misinformation the shop put the bolt pattern on centerline of my bracket, instead of a couple inches behind so I had to zig zag a bit. No worries, it will work. Just had to cut and paste it a couple times. Took a few tries to get it tacked in proper orientation before welding solid. I can't reach truck with welder, so had to use digital protractor and guesstimate, then tack, reinstall and see how each piece fit. Couple times and it was dead on. Now to drill for the four holes to attach to existing cross member. I have driveshaft angles all worked out using online calculator. I will need to roll pinion down from 5* to about 1*. This frame was from a short single axle and the driveshaft was short and aimed up. Now I have to go 120" and it has too much angle to get there. When I had the third box in, it wasn't an issue because it had a short driveshaft. There are a couple shims to pull but not sure if that will get me down. I may have to cut torque arm and shorten a touch. Time will tell, that is for another day. I got the cruise control cable all remade and hooked up. Should function as well as before. With the Z bar reverser I had to extend the cable to get to the block side and around to pull. It used to have a bracket on head of compressor and pulled on pump arm. This pump works back asswards and so has to reconfigure it. Luckily a std throttle cable fits it. Exhaust downpipe: After picking up the correct clamp, a short piece and a SS 90* pipe I was able to fabricobble it into one piece and it aims right down to my existing pipe that runs down under the truck. I just need to weld a 1/4" npt bung for my pyrometer. Will do that at work Monday as I need to use SS and TIG it. I only have mild steel Mig at home. Don't zoom in on the welds. They aren't pretty (my buddy would have made it look like jewelry but I wanted to do it myself). Thus I put some black paint on it. Ya, polished SS, it was what they had. Driveshaft sorta hanging in place. It will get wiped down after carrier bearing hanger is installed and then put some paint on it. Damn that thing is HEAVY! Even in two pieces. I put it up one piece at a time. I purchased steel Friday for the clutch linkage contraption. New revised sketch. It won't criss cross now. I am using the longer arm from the old Mack 5 spd(fits perfectly) and gets me down and away from transmission better to allow linkage clearance. It is the larger circle, the smaller is the arm I am building for clutch pedal. The item to lower right is the Z bar and it lays out the motion and travel I need. It is a plus to be an "engineer". 😆. I am nothing of the sort, but can draw shit. I will work on cutting pieces out for some machine work this coming week. Progress.......baby steps all around.
-
My good friend turns 71 July 18, I turn 60 on July 17. He still works pretty hard after retiring a couple years ago.
-
I wanted to make sure you knew you were right. Credit due!
-

Maxidyne Video
Freightrain replied to other dog's topic in Antique and Classic Mack Trucks General Discussion
Just saw a commercial last night for AI health advice. Wtf?? Shows a guy posting pictures of a rash and AI says" oh you have poison ivy, I will schedule a appt for you." They have bitched about people getting online and playing dr with trying to figure out what is wrong with yourself, now they give you AI shit and demand you use it. Wtf? -
We had a pair of fellows in Buckeye Vintage Haulers chapter, John and Tex. Both up in age but always at shows and happy to be still active. They have both passed now but sure miss seeing those guys at events
-
I have seen first hand the ones that retire and just sit. They usually don't live long. It is just the stress at work that wears on me and makes it hard to come home and work 3-4 hrs in the garage. I always feel better after working on the truck, because I complete small projects and feel like I accomplished something.
-
This project is showing me that I am running out of piss and vinegar. Hitting the 6 decade mark is a milestone for me that is hitting harder then any other before.
-
Turns out YOU WERE RIGHT!! I got jammed up by eBay once again. Right package, wrong part. Just like the steering yoke I found, it was swapped with a different part and wouldn't work. This clamp was same thing. I think it was bagged but the part number must have been wrong/altered(bag is gone now). I used a VIN given to me by a friend and I stopped at dealership today and asked for them to check the exhaust clamp part number. Part number was exactly what you gave me and BInGO it was the right clamp. I was surprised it was in stock. Fits perfectly, so I can start on the exhaust. Thanks again.
-
Maxidyne Video
Freightrain replied to other dog's topic in Antique and Classic Mack Trucks General Discussion
Yes, I saw part of the video awhile back and realized it was AI. Maybe it is mostly true but so many AI videos are just crap and misinformation. But if it gets you to click on it, they get paid. I watched a short video from a creator I enjoy and his concern was this crap stealing his information/videos and gaining profit from it. -
I stopped at my friends motor shop after picking up the driveshaft since I haven't made it down to lunch for a few Saturdays. A buddy was there and told me I'm working way too hard and he could never pull all this off. I told him I can't believe I'm even getting it done. It is an endless chore of assembly, fabricating, etc. Nothing like when I bolted the 237 in. Hook up a fuel line and go. Nothing that easy with this. Last night was fabbing up cruise control cable. Bracket is painted and ready to assemble on engine and then hook up cable. Should be good. Much easier with no fender in the way. No way I would get it done if I had to climb over that fender a 100 times. I also got the rear air tank hung back on. It used to feed air steering but I am leaving it for volume. I dropped it off to ease removed of old aux box. I use it to air my tires in race car at track. It has a check valve so it doesn't affect the rest of the system. I hooked the 13 spd air line to it, since it had an open port now with no steering line. The trans does shift ranges, as I confirmed it last night. I just need to fab up a handle. I just did a refresh on my clutch linkage drawing this morning. I think I found a better way and will confirm it tomorrow night.
-
I put my headlights on relays, so it eases the load on that old headlight switch. With the old halogen bulbs, the brights would kick the lights off. Now I can run them forever. The lights get power right off the back of the alt. with a couple circuit breakers, one for low, one for high beams. Oh, I put new drives on last years, just under $3000. The first set lasted 23 yrs! They still looked new but were way out of date!
-
I got 10 yrs out of that $300 237. It was time to upgrade. It's just insane the cubic money I have spent to upgrade things. But I know the old adage "spend some today, or spend a lot more tomorrow".
-
Rube Goldbergs finest hour.... Just some basic math...... 😆
-
Tired, broke man....
-
More retirement money spent..... 118" of all new steel. Getting an eyeball on making carrier bearing mounting plate. It needs to be a 12" drop from the existing cross member. Time for so more 1/2" plate. More progress up front also Lots of little stuff. I have the cruise control box apart and bought some new throttle cable to extend the reach as the new backwards throttle arm has a Z bar and I need to get to the block side to make a bracket to attach casing so I can hook cable up. Figuring exhaust out. I have new flange and a 45* SS elbow to cut down to make it go down and hook up to my existing flex pipe that attaches to exhaust. I laid out my clutch linkage on CAD this morning at work. I need to get some plate steel and start that project also. I left it at work, I will post a picture of the layout. I need a few new pieces to correct my AC suction line that is in the way of intake tube to turbo. I bought a new piece of 4" exhaust to make new intake tube to air cleaner. Just a straight shot now, old motor needed a zig zag. I also received my new dry element air cleaner today. That will one of the last additions as it is in the way when working on the truck of it is mounted on the cab. The struggle continues......
-
My filter was dry and the lines are all new. Took some time to get it all up. My right thumb is still numb from pumping forever. I installed a new primer but it doesn't seem to work as well asy old bailing ring style pump so I swapped it and it worked quickly.
-
I actually have an air tank from a CCX truck(orange) that friend gave me originally. I got an alum tank from a BMT member. Bob, I had the truck running this weekend after getting the fuel system bled. The only difference was a driver's side mount instead of passenger. I did find my oiler was loose from before and likely why it was taking more air then normal to start from the leakage.
-
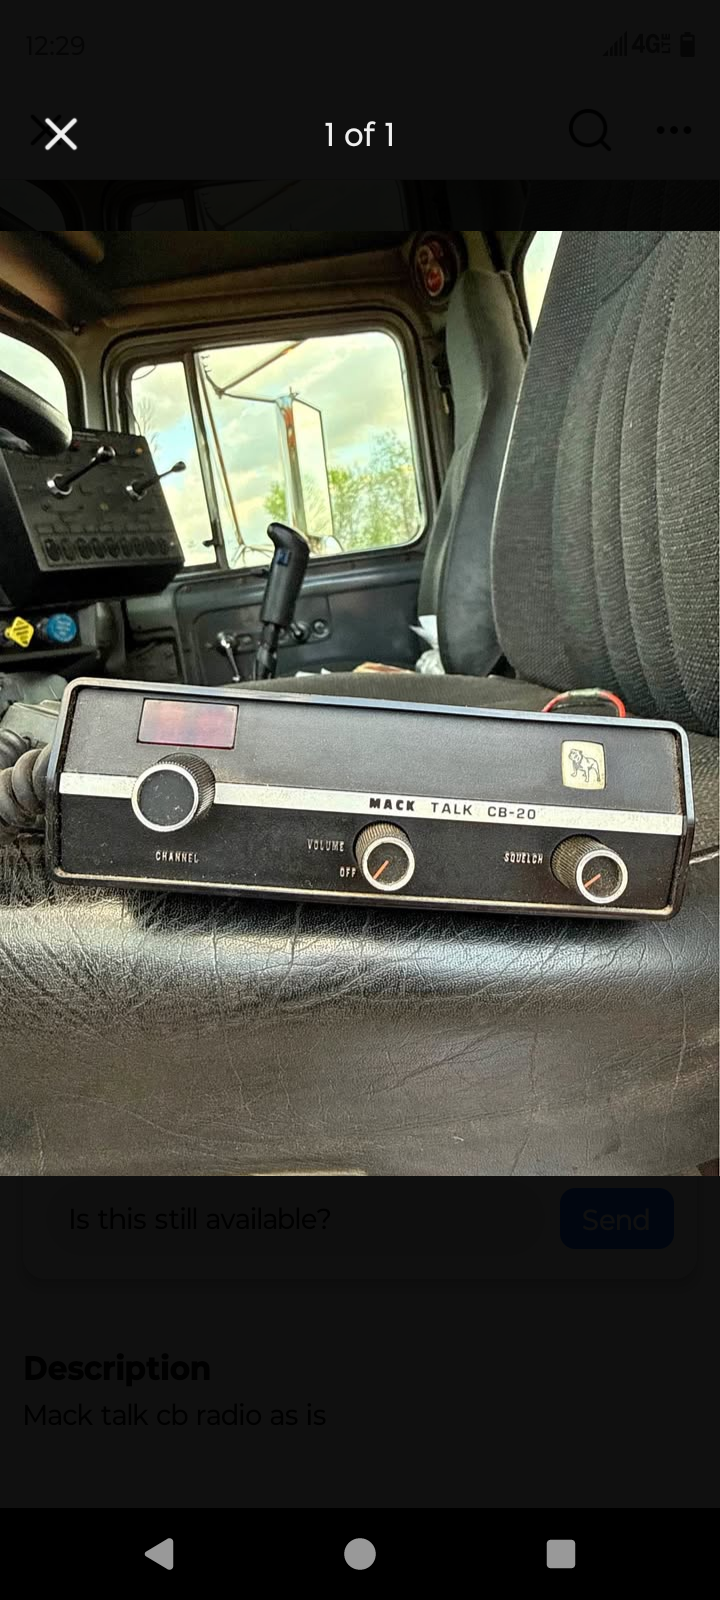
Growing up a friend lived a block over had a big base station. Cobra 139 with a VFO, a Varmint 850 watt linear and Moonraker beams. We'd stay up all Friday or Saturday night talking all over the place. His mom worked nights/dad divorced, so we had no one to watch us. I bought my first base from him, Navaho 23 ch that had been tuned up. It would push that Varmint harder then his Cobra. I put a Starduster ground plane on the roof and we had fun. Back then the neighbors would let me know if we were breaking into their TV shows. 😆. No cable back then and neighbors TV antenna was pointed directly north into my antenna. The Navaho died about 15 yrs ago and I found a President Madison and bought it. Don't really use it anymore. I have Unidens in my trucks. A 66 and a 68. I do have an old Realistic 23 channel radio-fone. I thought they were cool growing up so I found it on eBay for a few bucks and bought it. The plug is worn and headset won't stay plugged in tight, I tried to use it in the Mack but took it out. Sad their is not many talkers anymore.
-
The race car got away with just an oil change this winter, so it a cheap job this year.
-
😆 Karen asked a few weeks ago about had I had in this project. I laughed and said "you don't want to know". She is demanding to help pay. I always say "she's a keeper".
-
I came across this on FB marketplace. They want $250. Was this a real factory deal?

-
Yes, all new driveshaft with carrier bearing. When it had the extra box it had two separate shafts. Now with no aux, I have to get all new made. Should be the last big purchase.


BMT Forum Logo
