

Vladislav
-
Posts
7,830 -
Joined
-
Last visited
-
Days Won
76
Content Type
Profiles
Forums
Gallery
Events
Blogs
BMT Wiki
Collections
Store
Everything posted by Vladislav
-
They used to be avalible at Watt's Mack, the owner of this web-site. But seem currently out of stock. Worth to make a call and check out. http://www.wattstruckcenter.com/store/index.php?route=product/product&path=59_67&product_id=60
-
Even difficult to belive it was made by men and absolutely unbelivable it was restored
-
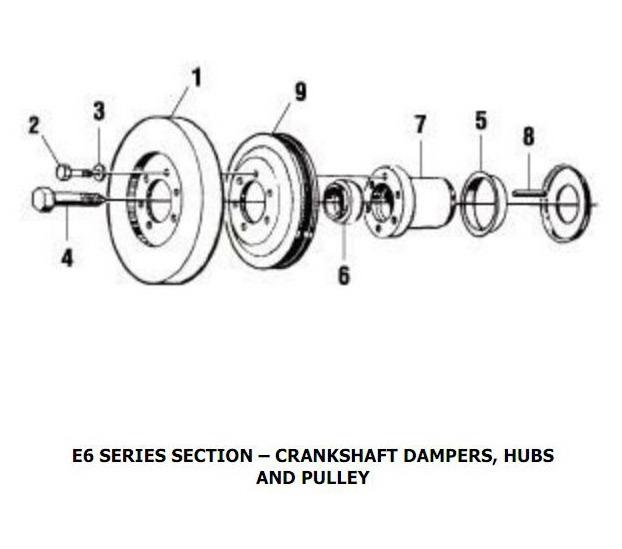
My guess is 4V engine utilizes different crank position to set the valves. That's why that double pointer was designed. 2V is a straight simple engine basically END673 and I see no reason you can't set the valve gaps when the crank is at TC.
-
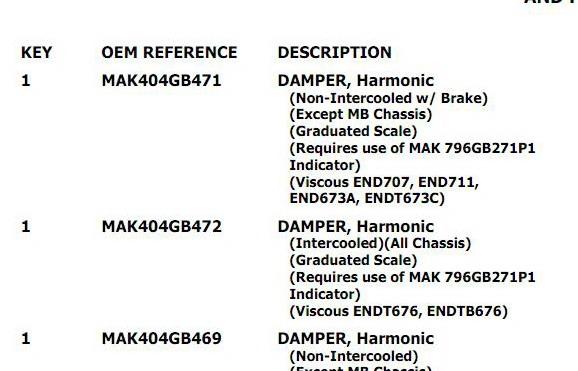
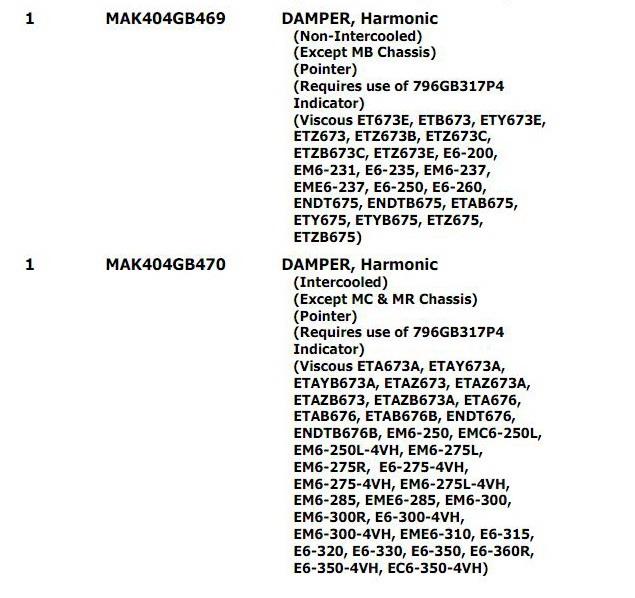
BTW the dampener off my truck is that 404GB470 judging by a mark stamped on it. R688 with E6 4V made in 1988. The pointer is a 2 edged one like on the photo above.
-
That's one really interesting idea with just checking out of balance. To me it seems a wheel balancer is not even needed for as long as a modern car's wheel requires dynamic balansing (it's colled that way here at least). A wheel's width is sufficient so you put weights at both sides of it. But if you want to balance a bycicle's wheel all you need is its axle and some common weights. I think something like that would be enough to just check the dampener. So I'm going to ask a lathe man to fabricate a couple of small "pancakes" to hold the dampener in between with a ball bearing in the middle. Adding any adhesive or magnetic weights to the dampener's outer diameter would tell how far it's off balance.
-
-
Wow! Thanks. It took me nearly 20 minutes yesterday evening to find a balanser. It was one from PAI though. I don't mean I found it locally, still in the States. It could be delivered to my place for reasonable cost but long in time. The item cost is expected to be US $450-500. I can afford it but there's plenty of other things I may use that worth for. Interesting that PAI states the same balanser should be used on both 2V and 4V E6's along with many other engines. The pics are from some NZ parts list which conteins Mack numbers but its basic source is a PAI parts list I belive.
-
Thanks for the tip. The truck is for play with and maximum expected milage is something like 3-4K km a year if I make a jorney with. Another point is about the only possible option on purchasing a new dampener overhere is PAI. I will check out the cost for more thoughts. Kept hopes to rich up with one off a Renault but now it seems like no way.
-
It doesn't leak. But I can see fat spot on its surface near the seam. No presence of any real fluid. Just a small darker area on an overall dry surface. Makes me scratching my head. The engine ran before I took it apart and didn't show any excessive vibration. But the milage was unkown and definitely huge.
-
The frame rail stampings were the same about the front end shape. The rail heigth was different for R600 standart rail and R700. That wouldn't be of a trouble for the conversion though. Cab mounts were located further to the back and they're probaly a different part than on R600. No doubt the rear cab mount crossmember location and the steering shaft length were different. Also a shift lever in the tranny needs to me modified or swapped. So to me it seems like such conversion is possible with a need of R700 hood and impressive amount of labour. A bit of addition. The said above concerns trucks made in the US. The brown land R-model engeneering had its own especiality. But in general the matter of the subject is the same.
-
E7 has a different crank shaft than E6 so the dampener may be different indeed. If so my interest quits at this point since I was going to swap my E6 dampener with a used E7 part. Here locally plenty of Renault Magnum engines are up for sale and many parted out. There were mechanical (?) 390hp and 430hp units along with 440 and 470 E-tech's. My actual dampener has a very small oily spot on its surface. Nearly 25 mm/1 inch long and 4 times narrower. Idk if that's crytical for a hobby truck or not but would like to eliminate the risk since I'm going to sandblast and paint it. Would be a shame to invest labour in a weak part.
-
Glenn, we wish you speedy and full recovery. That deciese is a nothing to fool with thing. Brain cells have ability to recover and regenerate. But they do it when you train them. So keep up and the things will be better.
-
Very noteworthy point. I would like to learn the same subject comparing E6-4V and E7 mechanical dampeners.
-
The rears is definitely Timken bogie which I suggest could be a factory setup but the statement of all original Mack bumper to bumper doesn't sound 100% correct. Ok, it may be all original indeed but not all Mack. Also strange to see no pictures taken from the side. Would be interesting to learn the style of the rear wheels. Definitely she's a rare animal. Thanks for sharing the link.
-
If you're talking about the side and lower parts they are actually pieces of aluminium angle and seem easy to fabricate having a bender or order in a metal shop. The top bezel is a different and difficult story.
-
Have you found the rack itself moving free? If it's not stuck no stuck plungers are expected to take place. And the revs jump could only be a matter of the governor. Or oil coming into cylinders but it would continue running after shutting off the fuel.
-
Man, that thing is huge! I always take my hat off for people who restore steam locs. It's a summit of an old school tech and increadable state of art at the same time. Sometimes when someone visits my place and asks on how much labour may be involved into restoration of a truck I point out there's people who make up locomotives. Thanks for sharing. I hope you will update the thread with pictures once the project is completely finished and up to public.
-

88 Superliner cab interchangeable
Vladislav replied to Whishy's topic in Exterior, Cab, Accessories and Detailing
Since your truck was made in Australia there wouldn't be much help from American guys on the subject. RW built in the US had different cab. And the cab on your truck is similar to a R-model cab used in the US and as how it looks to me from where I'm sitting Mack Australia used this style of a cab for all models built in the country. I mean R, RD, RW and Valueliner. Too possibly there were small nuances in the shape but generally Aussie cabs were the same. The main (and big) difference between US R-model and Superliner cabs was a cowl shape. R-model has top corners biased to follow the R hood curve. And the one for RW has square top corners, again to suit square RW hood. Mack Australia used the 1st style of the cab for both. And sorry I have no idea on it was different for early and later series Superliner or not. Judging by pictures posted on the net during 10+ years it appeared to me they were the same. -
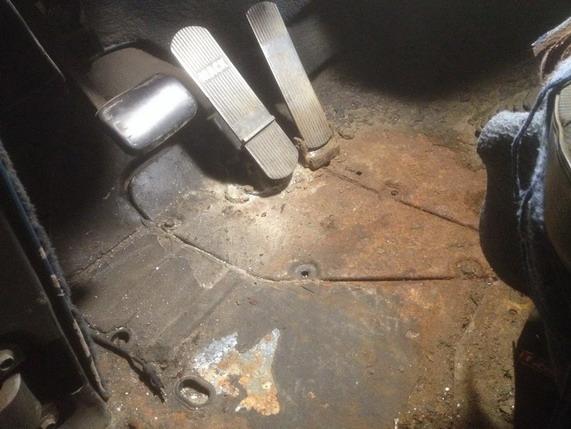
Yes, that's about that. My target was transmission swap so we removed both floors. But as I remember we did that partially. Took the screws off and than lifted the big floor a bit to access to the air lines. As long as I remember we didn't remove the treadle valve off the small floor when in the truck just took them off together. You need to pass the gear shift lever through the hole to get the big floor off (completely) and need space to do it and better two men to not scratch the dash etc. We did that 3 years ago and now I don't remember all the nuances. The screws were rusty and the floors either and if the memory serves well we took one floor up a bit and than the other and achieved the air lines. Something like that. All in all I remember it was relatively tight in the cab indeed and multiple air lines quite similar by the look but nothing extraordinar of a job to do. Some of the air lines can (and should?) be accessed from under the hood. The valve is visible if you look under the cab floor at the driver side from the engine compartment.
-
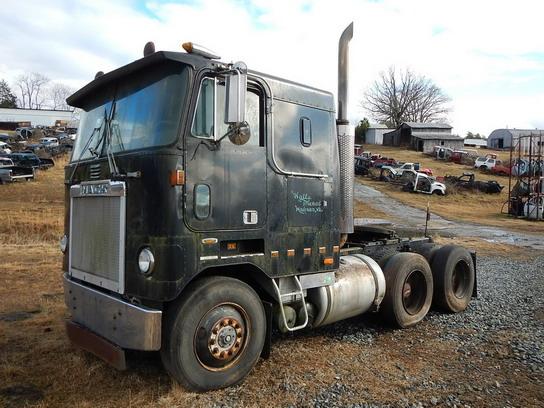
This truck was up for sale at some different place a while back. I saved a few pics from the ad and my files are dated as June 2014. It had a turbo removed at the time judging by the pic. Definitely an Allentown produced later series Cruiseliner.
_resize.JPG.646d712efbcd70fd643397d948570e80.JPG)
_resize.JPG.4a9fedf4788c7cda3efc51f55ff63850.JPG)
_resize.JPG.0d5bf20e87eceb31ff1d6ce35579503c.JPG)
-
The way of things is quite simple there. The floor conteins 2 removable parts. A larger one is at the right and a smaller at the left. The treadle valve is installed in the left one. Both panels attached to the main cab floor by a raw of screws. You probably would be good having only left (small) part removed. But may be wanting to take care of the larger one too if they both are rotted indeed. Both parts have simple shape and can be repaired by weld if the new parts cost is not friendly. So follow the advice Joey Mack gave to you. The valve has 9 or 10 or so air lines attached so there's a need to mark them. The seat remove would be of help no doubt but maybe it would be enough to get rid of only the driver's one.
-
Thanks for the figures. They bring some thoughts though. As I figured a plunger is not absolutely tight and does some leak back into the supply gallery. When a cam forces it up to make pressure it sure makes it but a small amount goes away. In dynamic it means the crack pressure gets achieved a bit later than if no leak absolutely. Amount of the leak is dependant to the pressure. So if you set higher numbers in a injector a plunger leaks more and it means the pressure crack gets later. What respectively means you get less actual injection advance. Taken that to account I would suggest Ambac and Bosch plungers have different tightness so the nozzles set different. And if you change the pump keeping the original injectors it would be wrong. A way may be to correct the pressure. As long as you go to Ambac and its injectors (Ambac nozzles) set higher I think it's possible to set Bosch nozzles to the higher pressure to work with Ambac pump. A nozzle only works better with higher Bars. But if you go from Ambac to Bosch you would need to lower the pressure setting. And that would be bad idea since a injector is supposed to spray under certain load. And if you set lower pressure it could loose spray quality.
-
Those mentioned and also including T2050 have even 0.60 OD. And they seem fine for a 300 Maxidyne but with 5.32 or so rears I belive.
-
Thanks the great! The build sheet for the truck mentioned 736GB259P10 injector assembly but I couldn't find the nozzle #. I suppose that is what you should put in yours if go with Ambac pump. But it seems to me no big difference could be found in injection and combustion if you use nozzles which were supposed for Bosch pump but operated with alternative Ambac unit. One more question from my side to complete my couriosity. Can't you check the manual for the injector crack pressure and maximum stroke amount for the pump calibration? This info would be enough for me to work out the pump and a set of injectors (I hope).
-
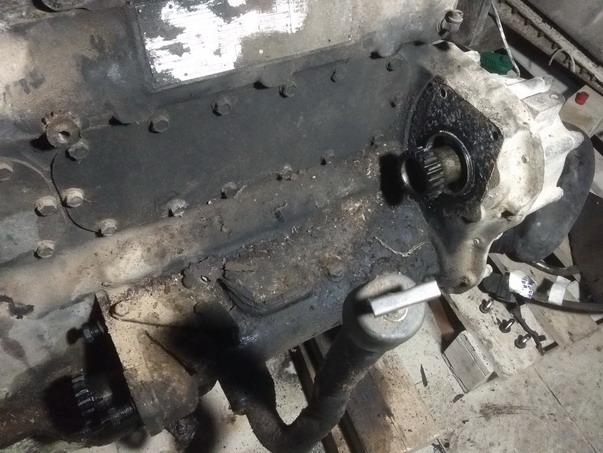
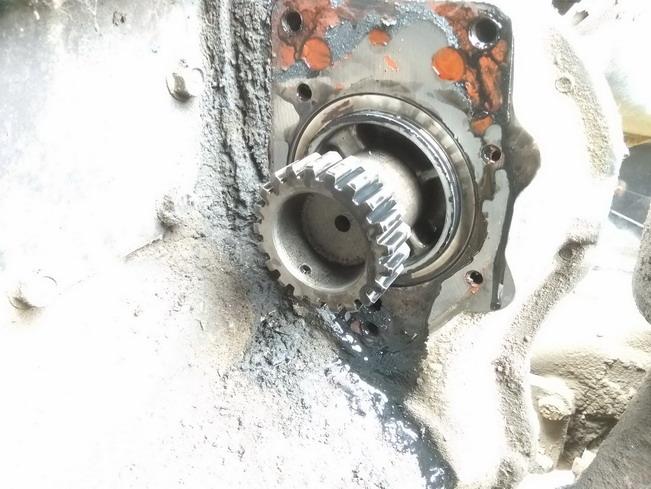
Now it seems the time is to me asking questions. I have a E6-350 4V in my R-model, made in the end of 1988 (1989 model year) and Ambac pump. Couldn't you tell me the part # of the injector nozzles mentioned in those tune up manuals? My pump tag tells 300 PLM450385A with Mack part # ?13GB5168P14. There's also a mentioning of 18 degrees so your info makes sence. Good way to check out leaks in the fuel supply system along with simple and efficient priming is use of electric fuel pump. I have a few taken off 90's years Mercedes cars which are handy to use because they have alu housing with 2 fittings (or just tubes) to put a rubber hose onto. Two terminals to attach wires and you connect them straight to a 12V battery. In many cases I just take an external battery to not hook up to the truck. Usually I use such pump for a test fit when I want to start up an engine which was out of operation for a long time. You can use hand prime as supposed to be done but it takes time and the prime pump may be bad or constant airing up may be present. What I do is just hook two hoses to the injection pump, one with electric pump put in series and the other one to the return fitting on the injection pump. Both hoses go into a jerrycan with diesel or even a plastic bottle. Last time when I dealt with that DM and found out the fuel filters messed up I didn't waste time and just put a car filter in series with the electric pump. When you power up the pump it brings fuel into the system in a matter of a few seconds with a raw of air bubbles coming into the can. Plastic bottle is even better for that reason since you can see all the air and dirt going from the injection. And if any leaky points get presence they show out immediately under positive pressure made by electric pump. I than make a try to crank the engine with the wires still on the battery and if it fires up successfully I that reconnect the fuel system to its normal setup. If the fitting is a straight bolt with cooper washers the latters seal the banjo around its cyrcle so the threads of the hole get inside them. And if a heli coil is used and it's not tight it would leak to inside the banjo making no issue. Figuring other possible reasons I met cracks where those small tubes come from the banjo barrel. Probably due to bending force during inaccurate removing of hoses. A friend of mine fought air in the system of his Mercedes car and ended up swapping that "banjo spider". Sure the cooper washers should be new or cooked up red hot prior the installation. If you have a good Ambac pump for the similar engine swap seems like reasonable solution. I dug up a couple of photos I made when removed pumps off two engines. The darker pic is E6-350 4V with Ambac and the brighter is EM6-300 4V after I took off a Robert Bosch unit on the DM. As you can see the engine side is the same. So more a matter of injection lines and other attachments.


BMT Forum Logo
